OpenPuck
Set up your OpenPuck: pick your kit · updated August 22, 2026
An OpenPuck is a tiny dongle that acts as a Steam Controller 2 wireless receiver (and can stand in as an Xbox, Switch Pro, or PlayStation pad). Tell us which one you have and we’ll show the right steps.
Which OpenPuck do you have?
Your OpenPuck came flashed and assembled, so there is nothing to build or install. Plug it into the machine you play on, pair your Steam Controller 2, and you’re set.
1 Plug it in
Plug the OpenPuck into a USB port on the machine you play on (your Steam Machine, gaming PC, laptop, or a dock) with the included USB-C data cable. It powers on right away and is recognized as a “Steam Controller Puck.” No drivers, no setup.
Any USB-A or USB-C port works. If you swap in your own cable or an adapter, make sure it’s a data cable; some are charge-only and won’t work.
2 Pair your controller
Turn on your Steam Controller 2 and put it in pairing mode. It links to the OpenPuck just like Valve’s official dongle. For the exact button steps, see the OpenPuck project.
Want a different layout? The OpenPuck can also present as an Xbox, Switch Pro, or PlayStation controller for games that expect those, switched with controller button chords.
3 Play
That’s it. Use it like any wireless receiver. Moving to another machine? Just unplug it and plug it into the next one; it reconnects on its own, no reinstall.
Keeping it updated (optional)
Your OpenPuck already ships on current firmware, so there’s nothing you have to do. If a newer version lands later, you can update it two ways: open the OpenPuck configurator in Chrome or Edge with the puck plugged into that computer, or, if you run Couchside on a Steam Machine / Bazzite box, let the app update it in a tap.
Good to know
- Not recognized? Try another USB port, and make sure any cable or adapter you add is a data cable, not charge-only.
- Controller won’t pair? Charge the Steam Controller 2 and retry pairing; the exact steps are in the OpenPuck project.
- Using it on more than one PC? Just move the dongle over and replug; there is nothing to reinstall.
- Open source: OpenPuck is open firmware (AGPL-3.0). See the OpenPuck project.
You’re building an OpenPuck from the printed case and a board: flash the board first with the Couchside app, stick on the two foam pads, seat the board in the case, and press the lid on. The case is a tight, one-way fit, so the flash has to happen before it closes.
Flash the board before you close the case
The lid presses on tight and is not meant to come off again; the case is designed to stay sealed. If you close it before flashing, the only way back to the board is to pry apart a case that doesn’t want to open. Flashing takes seconds, so do it first and you’ll never have to.
Flash it in seconds, with nothing to download
You don’t download a single file. The Couchside app flashes the OpenPuck firmware straight onto the board from your Steam Machine or Bazzite box. No firmware images, no drivers, no drag-and-drop, no command line. Plug the board in, tap Flash, and it’s a Steam Controller 2 receiver moments later.
What you need
- The printed OpenPuck case: a base and a matching lid (the two-part black housing).
- A board: an nRF52840 “Pro Micro” with USB-C and a UF2 bootloader (nice!nano-compatible). The Complete and Premium kits include one; the Case-Only kit is housing only, for DIY builders bringing their own.
- The two foam pads that come with the kit (any thin ~1 mm adhesive foam works in a pinch).
- A USB-C data cable: a real data cable, not a charge-only one, or the board won’t show up to flash.
- A machine running Couchside: a Steam Machine, Steam Deck, or any Bazzite / SteamOS / Linux box with the Couchside service installed. That’s what does the flashing.
1 Flash the firmware first
Plug the board into your Couchside machine with the USB-C data cable. A fresh board mounts as a tiny USB drive; that’s its bootloader, sitting there ready to be flashed.
Open the Couchside app on your phone and go to Setup → Utilities (flip Utilities on the first time). The OpenPuck card notices the board and shows a Flash button.
Tap Flash. Couchside copies the current OpenPuck firmware onto the board over USB from the box; a few seconds later the board reboots and comes back as a “Steam Controller Puck.” That’s it; the board is now an OpenPuck.
Couchside picks the right firmware, flashes it, and confirms it took, so you can trust it’s done before the case ever closes. Don’t have the app yet?
2 Stick on the foam pads
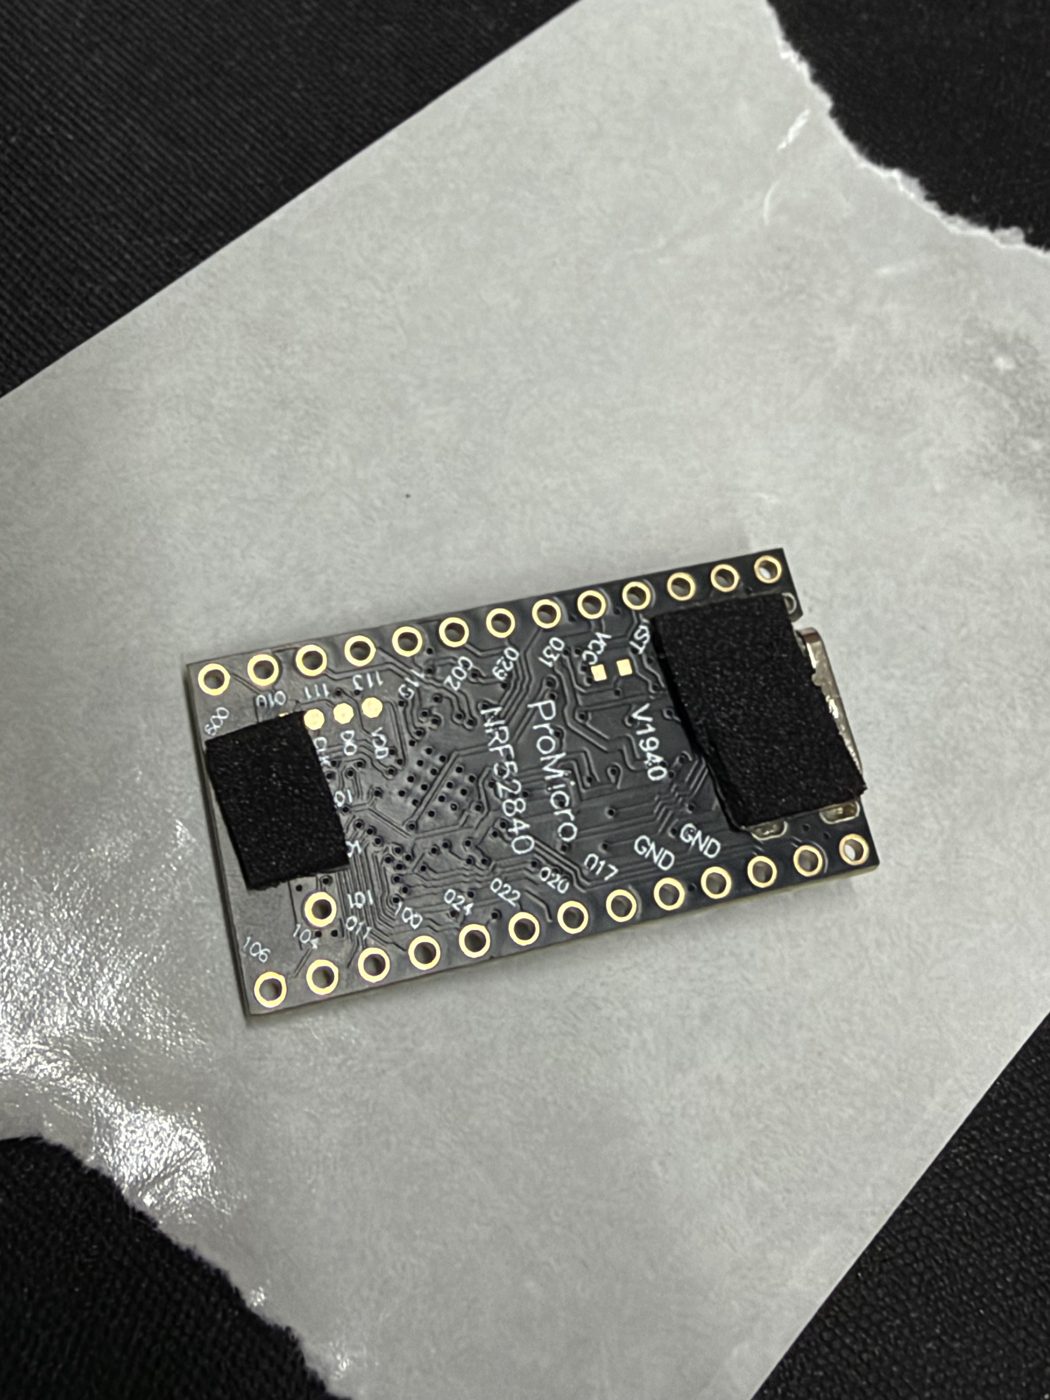
Peel and stick the two pads to the board exactly as shown below: one across the top near the USB-C end, one across the bottom edge. Keep them clear of the gold pin holes and the USB-C connector itself.
These pads are the anti-rattle. Once the lid is on they press the board firmly against the case so it can’t shift or buzz. Skip them and the board wiggles around inside.
3 Seat the board in the case
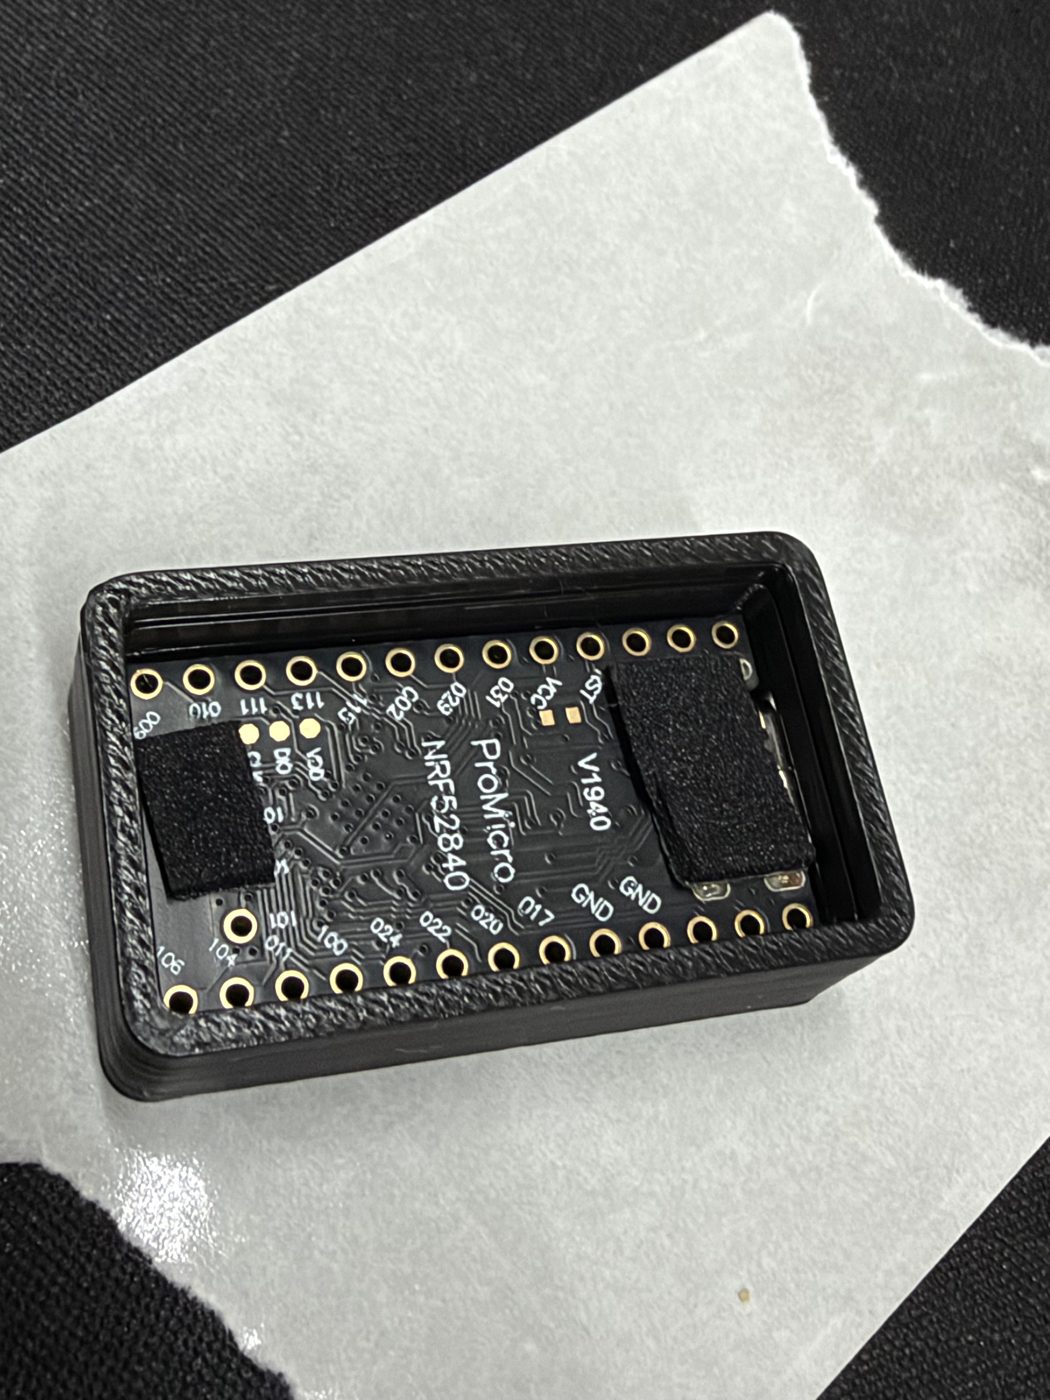
Drop the board into the base with the USB-C port lined up to the cutout at the top of the case. Press it gently down until it sits flat; the foam pads compress against the walls and take up all the slack.
Double-check the USB-C opening lines up with the connector before you go further; you want a cable to reach the port cleanly once the case is closed.
4 Press the lid on
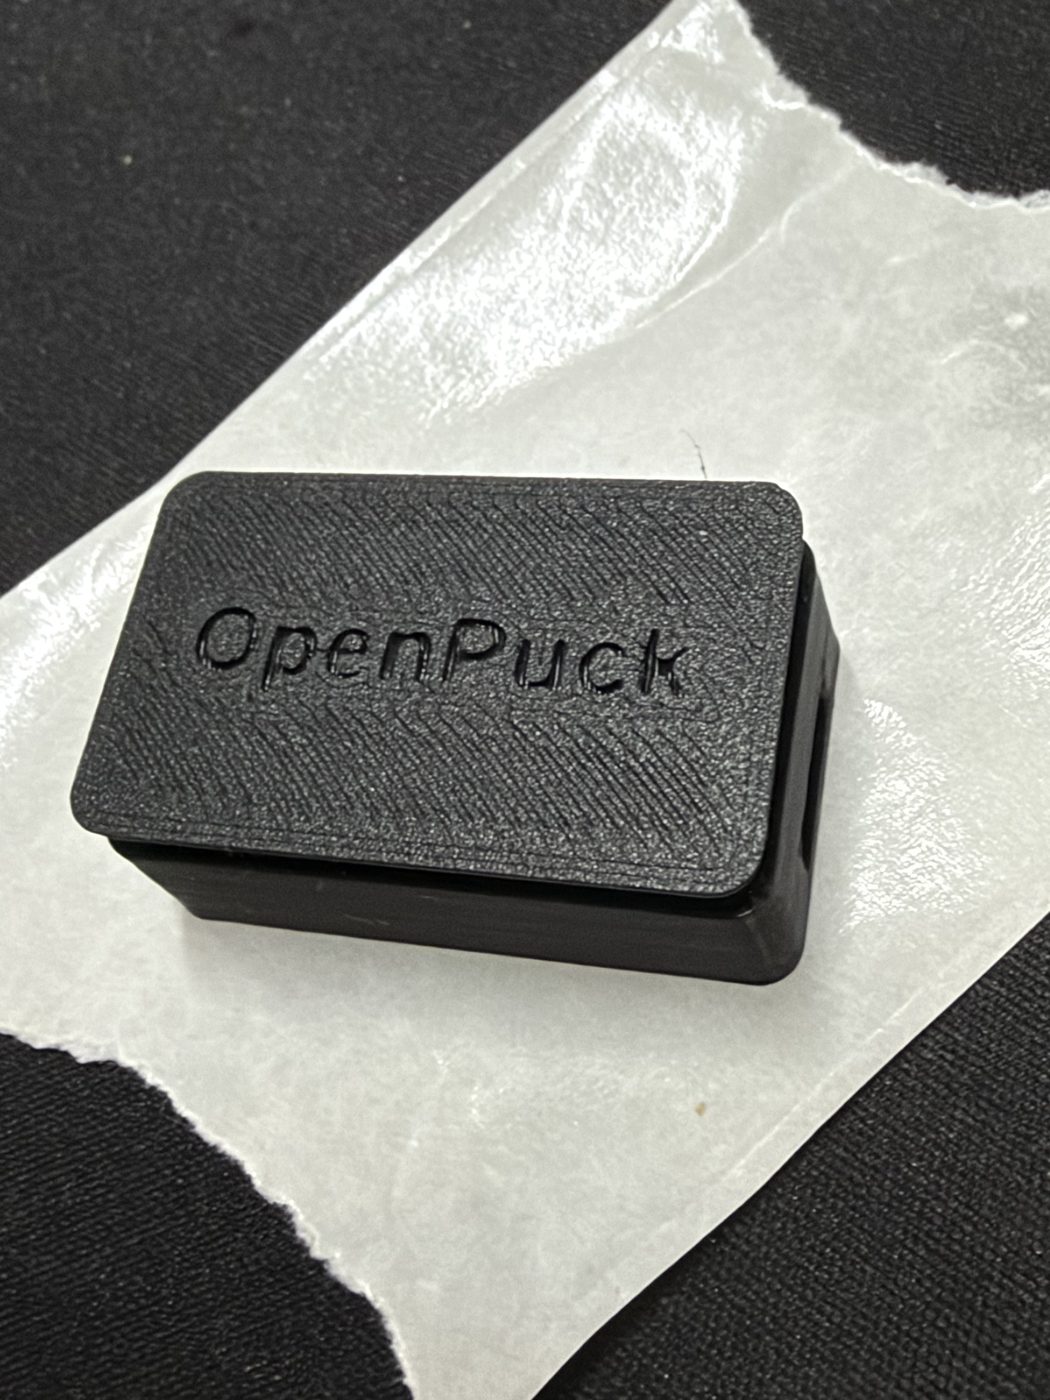
Line the lid up over the base and press it down firmly and evenly until it’s fully seated all the way around. It’s a tight friction fit; it seats home and stays put.
This is the point of no return: the case is built to stay closed and doesn’t pop back apart easily. So before you commit, make sure the board is flashed (step 1) and the USB-C port lines up with the opening.
5 Plug in and pair
Your OpenPuck is done. Plug it into whatever you game on (your Steam Machine, a PC, a handheld dock) and pair your Steam Controller 2 to it. It can also stand in as an Xbox, Switch Pro, or PlayStation pad using button chords. If you flashed it on the same machine you’ll play on, it’s already recognized.
Don’t have Couchside yet?
Couchside is a free app that turns your phone into the dashboard and remote for your gaming box, and the easiest way to flash an OpenPuck. Install the service on your box, then flash from your phone in one tap.
Good to know
- Board not showing up to flash? Most likely the cable. Swap in a known data USB-C cable, since many are charge-only. A brand-new board is usually already in flashing mode; if it isn’t, double-tap the little RST button on the board to drop it back into the bootloader, then flash.
- No Flash button in the app? Turn on Utilities under Setup → Prefs, and make sure the board is plugged into your box, not the phone. Couchside flashes from the box.
- Lost the foam pads? Any thin (~1 mm) adhesive foam works. The only job is to remove play so the board can’t rattle once the case is closed.
- Open source: OpenPuck is open firmware (AGPL-3.0). Couchside flashes the current release for you rather than hiding what it installs. See the OpenPuck project.
Keep this guide handy

Point a phone camera at this code to open this page on your phone; it’s the same code that’s on your kit’s sticker.

Questions?
Open an issue on GitHub or email support@couchside.tv.